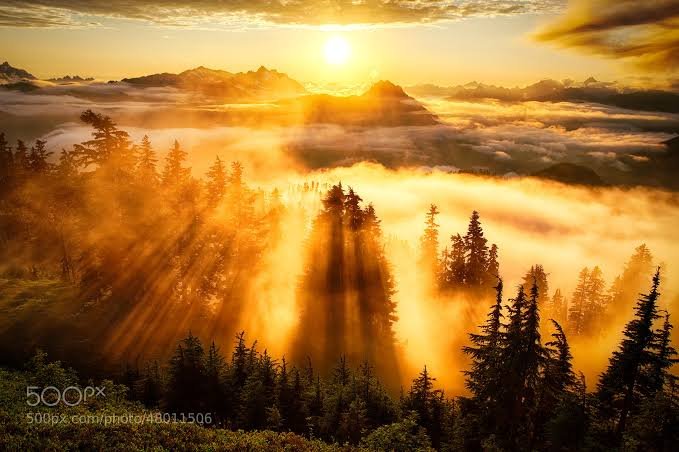

There are moments when the world seems to slow down. The light turns soft, shadows stretch across the ground, and everything looks just a little more beautiful than usual. That’s the magic of the golden hour.
Whether you’re photographing landscapes, portraits, wildlife, city streets, or even your morning coffee, this brief window of natural light can completely transform an ordinary image into something unforgettable. Many professional photographers schedule entire shoots around the golden hour because it offers the most flattering and cinematic lighting conditions available outdoors.
The best part? You don’t need an expensive camera to take advantage of it. A smartphone, mirrorless camera, or DSLR can all produce breathtaking results when paired with the right techniques.
In this guide, you’ll learn 10 practical tips that will help you master golden hour photography and consistently create stunning photos you’ll be proud to share.
What Is the Golden Hour?
The golden hour is the short period shortly after sunrise and just before sunset when the sun sits low on the horizon. During this time, sunlight passes through more of the Earth’s atmosphere, producing warm, soft, golden tones that flatter almost every subject.
Unlike harsh midday sunlight, the light during the golden hour is gentle, directional, and rich in color.
Why Photographers Love the Golden Hour
Some of the biggest advantages include:
- Soft natural light
- Warm color temperature
- Long, dramatic shadows
- Beautiful skin tones
- Reduced contrast
- Rich colors
- Easy exposure
- Cinematic atmosphere
- Natural depth
- Minimal harsh highlights
These qualities make the golden hour one of the most sought-after lighting conditions in photography.
Why Golden Hour Light Looks So Good
Light changes throughout the day. At noon, the sun is directly overhead, creating hard shadows and bright highlights.
During the golden hour, however, sunlight travels through more atmosphere. Blue wavelengths scatter, allowing warmer orange and yellow tones to dominate. The result is soft illumination that wraps naturally around your subject.
This is why landscapes appear richer, portraits look flattering, and outdoor scenes feel more emotional.
10 Golden Hour Photography Tips for Stunning Photos
1. Plan Your Shoot Before the Light Arrives
The golden hour doesn’t last long.
Depending on your location and season, it may last only 20 to 60 minutes. That means preparation matters.
Before leaving home:
- Check sunrise and sunset times
- Visit your location in advance
- Decide on your composition
- Prepare your camera settings
- Charge batteries
- Empty memory cards
Arriving early gives you time to explore different angles before the perfect light appears.
2. Shoot During Both Morning and Evening Golden Hour
Many photographers automatically choose sunset.
However, sunrise offers several unique advantages.
Morning golden hour often provides:
- Cleaner air
- Less haze
- Fewer people
- Calm weather
- Peaceful surroundings
- Fresh colors
Evening golden hour delivers:
- Vibrant sunsets
- Warmer tones
- Active city scenes
- Dramatic skies
Try both and discover which style fits your photography best.
3. Use Backlighting for Magical Portraits
One of the easiest ways to improve portraits during the golden hour is to position the sun behind your subject.
Backlighting creates:
- Soft glowing hair
- Beautiful rim light
- Dreamy atmosphere
- Natural separation from the background
To avoid underexposing faces, slightly increase exposure or use exposure compensation.
This simple technique instantly creates professional-looking portraits.
4. Experiment with Lens Flare
Most beginners try to avoid lens flare.
Experienced photographers often embrace it.
During the golden hour, controlled lens flare can add:
- Warm glow
- Artistic character
- Emotional storytelling
- Cinematic effects
Move slightly left or right until the flare complements your composition instead of overpowering it.
A lens hood can help control unwanted flare while still allowing creative effects.
5. Use Manual Camera Settings
Automatic mode doesn’t always understand changing light.
Manual mode gives you complete control over:
ISO
Keep ISO low whenever possible.
Low ISO reduces image noise and preserves detail.
Aperture
Choose a wide aperture for portraits to create soft background blur.
Use a narrower aperture for landscapes when maximum sharpness is needed.
Shutter Speed
Adjust shutter speed based on movement.
Fast shutter speeds freeze action.
Slower speeds create motion blur for flowing water or moving clouds.
Learning exposure basics dramatically improves golden hour photography.
6. Look for Long Shadows
One unique feature of the golden hour is the long shadows created by the low sun angle.
Instead of avoiding shadows, use them creatively.
Long shadows can:
- Add depth
- Create leading lines
- Produce abstract shapes
- Increase visual interest
- Enhance storytelling
Street photographers especially benefit from dramatic shadow patterns.
7. Include Foreground Elements
Depth makes photographs feel immersive.
During the golden hour, foreground subjects catch beautiful warm light.
Try including:
- Flowers
- Rocks
- Grass
- Trees
- Fences
- Water reflections
- Sand dunes
- Architecture
Foreground elements naturally guide the viewer toward the main subject.
8. Shoot in RAW Format
RAW files preserve much more image information than JPEG.
This becomes especially valuable during the golden hour, when highlights and shadows contain rich detail.
RAW editing allows you to:
- Recover highlights
- Brighten shadows
- Adjust white balance
- Improve color grading
- Increase dynamic range
- Fine-tune exposure
Although RAW files require more storage, the editing flexibility is worth it.
9. Watch the Sky After Sunset
Many photographers pack up as soon as the sun disappears.
That’s often a mistake.
The sky frequently becomes even more colorful 10 to 30 minutes after sunset.
This period is sometimes called the “blue hour,” where deep blue skies blend beautifully with lingering warm colors.
Stay longer and you’ll often capture your favorite image of the day.
10. Practice Composition, Not Just Lighting
Beautiful light alone won’t create a memorable photo.
Strong composition remains essential.
Popular composition techniques include:
- Rule of thirds
- Leading lines
- Symmetry
- Framing
- Negative space
- Reflections
- Layering
- Minimalism
- Foreground interest
- Natural balance
Combining excellent composition with golden hour lighting creates photographs that truly stand out.
Best Camera Settings for Golden Hour
| Setting | Recommended Starting Point |
|---|---|
| ISO | 100–200 |
| Aperture (Portrait) | f/1.8 – f/4 |
| Aperture (Landscape) | f/8 – f/11 |
| White Balance | Daylight or Cloudy |
| File Format | RAW |
| Focus Mode | Single AF or Manual |
| Metering | Evaluative or Spot |
| Exposure Compensation | +0.3 to +1 when needed |
These settings provide a solid starting point, though adjustments will depend on changing light.
Common Mistakes to Avoid
Even experienced photographers occasionally miss opportunities.
Avoid these common mistakes:
- Arriving too late
- Ignoring weather conditions
- Shooting only one angle
- Forgetting extra batteries
- Using high ISO unnecessarily
- Overediting colors
- Blowing out highlights
- Skipping foreground elements
- Relying entirely on auto mode
- Leaving immediately after sunset
Small improvements in preparation often produce dramatically better images.
Essential Gear for Golden Hour Photography
You don’t need the most expensive equipment.
Helpful gear includes:
- DSLR camera
- Mirrorless camera
- Smartphone with Pro Mode
- Tripod
- Polarizing filter
- ND filter
- Wide-angle lens
- Portrait lens
- Lens cloth
- Extra batteries
- Memory cards
- Camera backpack
Remember, good light and creativity matter far more than expensive gear.
Editing Tips for Golden Hour Images
Editing should enhance your photos rather than completely change them.
Focus on subtle adjustments:
- Increase warmth slightly
- Recover highlight detail
- Lift shadows carefully
- Add gentle contrast
- Improve vibrance
- Reduce noise
- Sharpen important details
- Correct lens distortion
- Fine-tune white balance
- Crop for stronger composition
The goal is to preserve the natural beauty of the golden hour, not overpower it.
Golden Hour Photography Ideas
Need inspiration?
Try photographing:
- Family portraits
- Couples
- Children
- Mountains
- Beaches
- Lakes
- Forest trails
- Wildflowers
- Farm fields
- Wildlife
- Birds
- City skylines
- Historic buildings
- Bridges
- Roads
- Rivers
- Waterfalls
- Silhouettes
- Reflections
- Pets
Each subject gains warmth and emotion under golden light.
Why Weather Matters
Clear skies aren’t always ideal.
Some clouds can make golden hour even more spectacular by reflecting warm sunlight across the sky.
Excellent conditions include:
- Partly cloudy skies
- Light fog
- Thin clouds
- Misty mornings
- Calm lakes
- Fresh snowfall
These conditions often create dramatic colors and unforgettable scenes.
Final Thoughts
Mastering golden hour photography isn’t about owning expensive gear or memorizing complicated camera settings. It’s about learning to recognize beautiful light, preparing ahead of time, and making thoughtful creative decisions while that light lasts.
Every sunrise and sunset offers a new opportunity to experiment with composition, natural light, exposure, and storytelling. Some days you’ll capture dramatic landscapes. Other days you’ll create warm family portraits or peaceful street scenes that feel full of life. The more often you shoot during the golden hour, the more instinctive your photography will become.